Hairdo’s You Can Actually Do
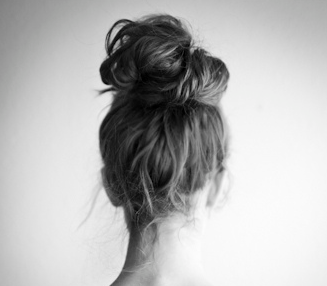
Photo labeled for reuse via flickr.com under the Creative Commons license.
Let’s face it, being a girl and having hair is a love/hate relationship. This one goes out to the girls whose hair refuses to fall perfectly every day, or for those days where hair goals don’t match up with laziness levels.
Below are some basic hair products to help your hair game, plus some recommendations at pretty cheap costs.
Dry Shampoo- Try: Not Your Mother’s Clean Freak Refreshing Dry Shampoo / Walmart, $4.58. Spray into your roots before you go to bed and brush out in the morning for new looking hair without any effort, or for added texture and volume for limp hair days.
Moroccan Oil / Coconut Oil / Leave-in Conditioner- Try: Garnier Fructis Sleek & Shine Moroccan Sleek Oil Treatment / Walgreens, $6.29. Depending on your hair type, adding one of these moisture-locking products to your routine can greatly help the overall shine-factor of your hair while minimizing dryness.
Heat Protectant Spray- Try: TRESemmé Thermal Creations Heat Tamer Spray / Walmart, $4.99. Especially for fine and easily damaged hair, heat protectant acts like insurance for those sometimes inevitable split ends, letting you breathe a little easier when curling and straightening.
Wash Your Hair With the Good Stuff- Lauren Borlovan recommends Herbal Essences Long Term Relationship / Walmart, $3.27. Go with what your hair type needs, and stick with moisturizing products.
Now that you have some basics to take your hair game a step further, here are some hairstyles that don’t take a professional stylist to achieve. Because let’s be honest, most mornings even picking up the hairbrush sounds impossible. While I may not be an expert, these ideas make my bad hair mornings much more manageable. Having nice hair some days can be fun and doesn’t have to be overly hard, no matter how convenient going bald may start to seem.
Simple, Messy Curls
Time: ~10 minutes (depending on hair thickness)
No Heat
- The night before, get out a stretchy headband and put it over your hair like a crown.
- Take the pieces closest to your face and wrap them over and down through the hair band.
- Take the piece you previously pulled through the headband and add the next section of hair, wrapping it over, down and through the headband the same way.
- Continue to wrap your hair until you reach the back of your head on both sides and look like you’re from the 1940’s.
- Sleep on it! You can figure out how to tame your waves in the morning with little to no time.
Heat #1
Using heat tools might scream “effort” to you, but sometimes it’s the easiest way to force your locks to cooperate. Here’s how to quickly achieve a perfect curl without killing your hair. It takes some practice, but is easier than straightening after a few tries.
- Spray dry hair down with heat protection.
- Using a one to two inch curling iron, clamp a section of hair close to the roots using your right hand.
- Taking your left hand at the base of the curling iron, twist the curling iron away from your face.
- While twisting, release the clamp bit by bit until all of your hair is rolled into the curling iron. Eventually, this will be a quick, fluid motion and only takes about a minute per strand of hair.
- Once you reach the bottom of the strand and hold for a few seconds, un-clamp the strand completely. This ensures that the delicate ends of your hair get the least amount of heat. Continue to curl your hair away from your face until the desired curliness is reached.
- Let all the curls cool before you mess with them. This will allow the curls to set, and after a few minutes you can tousle your newly curled hair by hair spraying and teasing.
Heat #2
This trick is another common curling method, but will also get you at least a dozen comments of, “Is your hair naturally like this?”
- Take a regular curling iron and wrap a section of hair around the outside of the barrel without clamping it.
- Repeat. For consistent waves, curl all the pieces on the right side away from your face and do the same for the left. For more natural, artsy waves, curl the strands in random directions and ensure that the strands closest to your face are curled away from your face.
- Let it cool and hairspray with your hair flipped upside down. To soften the curls, take a comb and brush up from the bottom of the curls. This looks best when all of the sections of hair are isolated because they keep their shape better.
The Fake Updo
Time: 5 minutes or less
Perfectly messy hair is best for this simple, effortless style.
- Gather a bunch of bobby pins. You know the ones – under your dresser, in your purse, thrown in last week’s coffee mug. If you’re not a current bobby pin user, you can afford a pack of 100 with some pocket change. Bobby pins are versatile and effective, but be warned that they are also disappearing magicians.
- Set the bobby pins aside and gather your hair into a bun-like pile on the back of your head.
- Secure with as many bobby pins as it takes. (This may be difficult with thick hair.)
- Try to conceal the pieces of metal with loopy strands of hair and take out the ineffectual ones, but this look is best when it’s literally effortless.
- Pull out some face framing pieces and you’re ready to take on the day, you classy girl, you.
The Half Up, Half Down
Time: Almost none
Flower Braid
This is a fun twist on the half-bun trend and is almost easier to make work.
- Take the front sections of hair from both sides of your head and pull them to the back of your head. Secure with a mini-rubber band.
- Loosely braid this section to the bottom and secure with another mini-rubber band.
- Twist the braid around into a bun, and bobby-pin it securely. Pull out face framing pieces.
Do the Twist
- Take the front sections of hair from both sides and twist each one.
- Pin one side’s twisted piece slightly past the center of the back of your head.
- With the other side’s twisted piece, place it underneath the other one at the back of your head and pin it into place slightly past the center so that you can see both strands twisted together at the back of your head.
The Messy Bun
Time: Also almost none
Notorious for its ironic difficulty, here is one way to simplify this classic look while adding volume and texture.
- Make your hair messy! (Most of the times, this step is conveniently already completed). Also, adding dry shampoo to the roots helps with grip.
- Quickly gather all of your hair to the top of your head and secure it with a rubber band.
- Separate the resulting ponytail into a few sections and tease them individually.
- Twist the pieces together and pin/band them into place.
- Finish off your bunned look with some face-framing pieces and by tugging out the tighter sections of your hair.
For the most part, these hair ideas can be modified and rotated to fit your own personal hair type and style. Have fun with your hair and enjoy trying new things with it, because YOHHO (You Only Have Hair Once).

Hi friends. I am a senior at Air Academy and I will be the Junior Marketing Editor for the Jetstream Journal this year. If you brought me coffee today,...


Whitney Moran • Feb 4, 2016 at 1:32 pm
This is so great! I love finding new fun hairstyles that I can do!
Emma Wood • Feb 4, 2016 at 1:30 pm
Great article! I can’t wait to try out a flower braid.
Audrey • Feb 2, 2016 at 4:33 pm
This is so helpful Tali! I’ll be sure to check out those products.