“Hot” Hair In Time For Summer
As summer slowly begins to approach on our calendars, us girls begin shedding our makeup and putting away the heating tools. Summer is a time for you to go all natural, and give your hair a break, but for those who also just want a quick summer-do with some easy curls, we got you covered. We have devised some quick easy no-heat and heat hairstyles to cover your summer physique.
No Heat:
Beach waves-
Everyone loves this soft, careless look that only takes minutes to do! For the girls that already have wavy to curly hair,![[untitled photo of no heat curls].Retrieved April 14, 2014, from:http://1.bp.blogspot.com/-KfqEFMpbhBc/UR2P38aW4dI/AAAAAAAALAw/LV1i6bd9i4Y/s1600/1-26+2.jpg](https://thejetstreamjournal.com/wp-content/uploads/2014/04/1-26-2.jpg) use this “Sea Spray” to achieve your look.
use this “Sea Spray” to achieve your look.
-
1 Cup Warm Water
-
1 Tbs Sea Salt
-
1 Tsp Coconut Oil
-
1 Tsp curling gel.
You can go buy a spray that will give you care-free tousled waves, but I find that when using store bought products, a lot of them contain ingredients that dry out your hair, like Isopropyl alcohol, Propanol, and Propyl alcohol SD. When you’re making your own hair product, you know exactly what’s going in your hair. For the ladies that don’t have a curl based hair, one french braid should suffice. Add a little coconut oil in damp hair and braid. Once dried, take out your braid, spray your hair with your sea spray, and shake out your waves.
HeadBand curls-
I personally love when my hair is all dolled up and curled, but with my hair being thicker than the Amazon Rainforest, finding the patience and time is out of the question. Head band curls are a favorite for me because with a little practice, you can do this in under 10 minutes. The actual process is quite simple – you just wind your hair around a headband and sleep on it.
Twisty Bun-
![[untitled photo of twisty hair bun].Retrieved April 14, 2014, fromhttp://4.bp.blogspot.com/-nF9puuWiyPE/Uj5D4_RSuKI/AAAAAAAACso/0XIXIM6YGF0/s1600/alittlesliceof+easy+twisty+bun.jpg:](https://thejetstreamjournal.com/wp-content/uploads/2014/04/alittlesliceof-easy-twisty-bun.jpg) Second day hair can be annoying and feel gross, so I found that the best way to make my hair look semi-decent and not annoy me is to get it out of my face. The twisty bun is fast and looks like you put in a lot more effort than you actually did. Begin by parting your hair down the middle, then put your hair in two high ponies in the back of your head. After, part one of the ponies in two sections and twist them together to make a rope braid. Do that to both ponies. Then cross the two rope braids and secure with an elastic or bobby pins.
Second day hair can be annoying and feel gross, so I found that the best way to make my hair look semi-decent and not annoy me is to get it out of my face. The twisty bun is fast and looks like you put in a lot more effort than you actually did. Begin by parting your hair down the middle, then put your hair in two high ponies in the back of your head. After, part one of the ponies in two sections and twist them together to make a rope braid. Do that to both ponies. Then cross the two rope braids and secure with an elastic or bobby pins.
Braided Ponytail-
Another one of my go-tos for second day hair is braids! The weaving pattern that braids contain breaks up your oily hair and actually works better. The Braided Ponytail is simply a side french braid from your part down to your ear, and then secured with an elastic, leaving the rest of your hair loose. You can do so much with this; the braided bangs keeps your hair out of your face, but it’s so fast that there are countless combinations. You can continue your braid around your head, called the “Katniss”, or rap your ponytail into the bun!
These are only a few of the hundreds of heatless hairstyles you can do. My personal goal is a no heat summer except for special occasions. In those cases, here are a few of the ones I turn to:
Dutch Lace Braided Headband-
This hairstyle is pretty simple. It’s basically a modified Dutch braid that goes horizontally across your head and creates a nice accent for curled or straightened hair.
Step 1: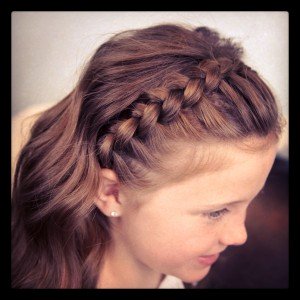
After loosely curling your hair, create a part in your hair going from ear to ear; this will be the hair that you will be using to create the “headband”. Section off the rest of your hair in a ponytail.
Step 2:
Begin with three strands and Dutch braid the hair so the outermost strand doesn’t have any hair added to it. The braid can either be centered by the part or closer to the hairline.
Step 3:
Once finished, continue with a regular braid, and then tuck the hair under your head and secure with a bobby pin. The pieces in the braid can be loosened to create the illusion of having a thicker braid.
For a more visual tutorial, you can visit http://www.youtube.com/watch?v=-MnnN-Eeygk to watch a video.
Classic Half Up-Do-
 This hair-style can be worn for casual or formal events.
Step 1:
Begin by curling small strands of hair into many layers. Use a flexible hairspray to lock the curls in place, but still allow for movability.
Step 2:
Section off the hair by starting above the ears and meeting at the very back of the head. Place the lower portion into a ponytail. Next, you can start teasing the upper portion until the end result is desirable. (This is optional)
Step 3:
For this part, there are multiple options. First of all, you can divide two small strands of hair on either side of the head, and begin lace braiding them, or so no hair is added to the lower-most strand, eventually combining them in the back and securing together with bobby pins. Second, you can just twist these strands instead, gradually adding more and more hair, and then securing with bobby pins. Finally, you can bring this section of hair all together, pinning it back or using a clip. After, you can gently pull out some shorter strands to create a messier look (if you have layers)
Step 4:
Release the lower portion of your hair and finish with another coat of hairspray to help the hairstyle stay in place.
Sleek Low Pony-
Again, this look is one that is good for casual or formal events.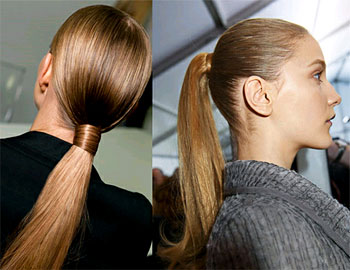
Step 1:
Straighten the hair, being very diligent about getting that completely straight look. You can create a part anywhere you like, or you can have no part at all.
Step 2:
Gather all the hair at the nape of the neck or in the center of the head, except for a small strand under the ponytail. Secure hair with a clear elastic band. Wrap the hair that was left out around the ponytail and tuck its end under the clear elastic band.
Step 3:
Finish with hairspray to flatten any fly-aways to complete the look.
Messy High Pony-
 This hairstyle looks good with a bunch of curls that add texture and bounce. It’s also good if you have long layers.
Step 1:
Curl your hair in many layers, and in different directions.
Step 2:
Gather your hair at the top of the head and secure with a clear elastic band. Gently pull at strands, loosening the hair. If you have bangs allow them to fall wherever they may or pin them up loosely.
Step 3:
Secure with hairspray.
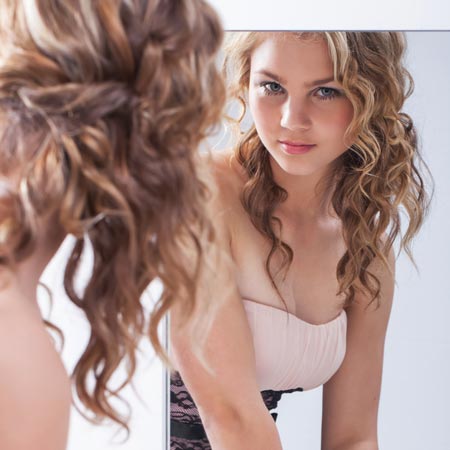
Retro Curls-
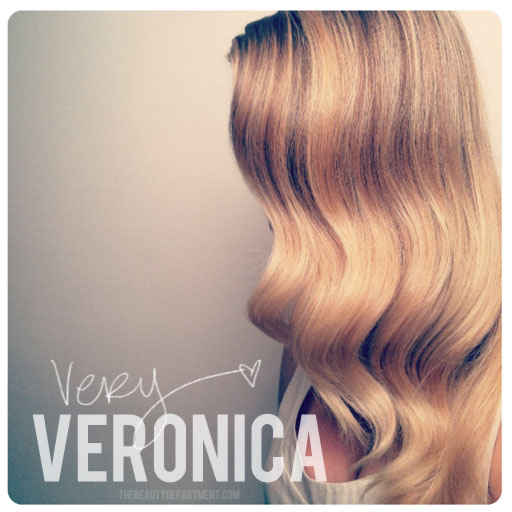
Retro curls can be achieved in many different ways, but here is one way that primarily uses curling, sourced from thebeatydepartment.com in an article by Kristin Ess. These curls are a good way to dress up your regular hair for a special event or important night.
Step 1:
Start with clean, dry hair. Create a deep side part.
Step 2:
Use a 1 inch curling iron or wand to curl pieces of hair, curling them towards your face. Continue using a pattern where all pieces look similar.
Step 3:
Spray with hairspray and allow to dry for 5 minutes. Then take the fine-sided part of your comb and gently comb out the curls. They will start joining and becoming more uniform in loose waves. Keep combing and adding hairspray when necessary.
Step 4:
Curl any straight ends under and use a final coat of hairspray.
Citations:
Cute Girls Hairstyles. “Lace Braid Headband.” YouTube. YouTube, 17 Mar. 2013. Web. 30 Mar. 2014.
Ess, Kristin. “SIMPLE VINTAGE WAVES.” The Beauty Department. N.p., n.d. Web. 30 Mar. 2014.


Kayla Wiitala • Apr 15, 2014 at 11:49 am
I really liked the “twisty bun” I feel like it will be super useful.
Lauren Bown • Apr 15, 2014 at 11:21 am
This is a really fantastic article! (: I love all of these ideas and it’s very beneficial for girls with lots of hair because we’re always looking for new ideas!